Inquiry Cart(0)
Inquiry0
这里是产品名称
How to install lace-up hoisting grip?
- Categories:Communication knowledge
- Time of issue:2017-09-19 10:23
(Summary description)Whatishoistinggrip?Hoistinggripisdesignedforquickcoaxialcableinstallation.Itiscommonlymadebystainlesssteelortinnedcopper.Thesematerialshavehighcorrosionresistanceandgoodductility.Therearetwotypesforfe
How to install lace-up hoisting grip?
(Summary description)Whatishoistinggrip?Hoistinggripisdesignedforquickcoaxialcableinstallation.Itiscommonlymadebystainlesssteelortinnedcopper.Thesematerialshavehighcorrosionresistanceandgoodductility.Therearetwotypesforfe
- Categories:Communication knowledge
- Time of issue:2017-09-19 10:23
Information
What is hoisting grip?
Hoisting grip is designed for quick coaxial cable installation. It is commonly made by stainless steel or tinned copper. These materials have high corrosion resistance and good ductility. There are two types for feeder cable hoisitng : lace-up & pre-laced hoisting grip.

Lace-up hoisting grip

Pre-laced hoisting grip
Here we mainly introduce lace-up grip for feeder cable.
Lace-up hoisting grip can lace up at any point of waveguide cable, it's quite suitable for installed cable, doing great help when cable replacing needed. However, it's also widely used in Fiber optic cable, Marine, Petroleum and other fields. It features a small component and a large working load, easy to use for quick operation.
How to install lace-up hoisting grip correctly?
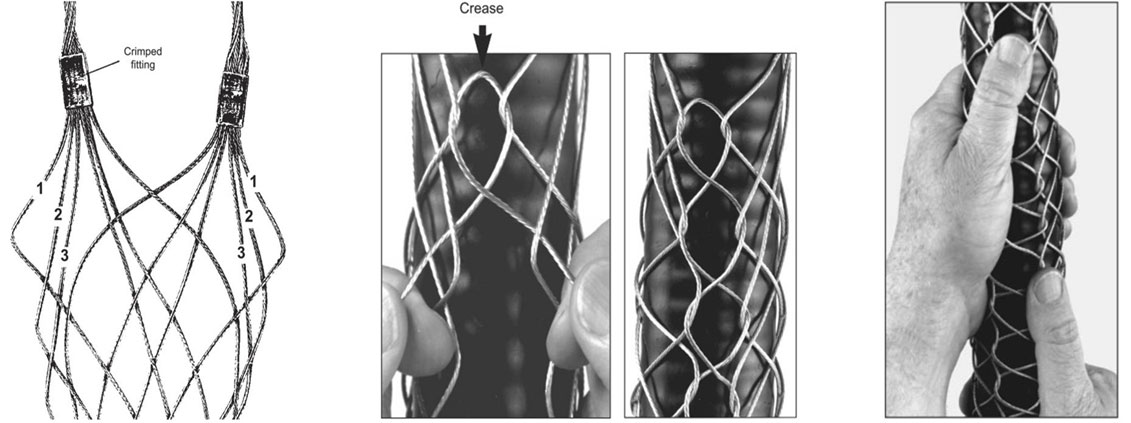
Step 1. png1. Place the hoisting grip at an proper location of cable. It should have an enough length between the connector and the grip so as to reach the antenna input when hoisting is completed.
Step 2. Identify the first three loop pairs to be laced at the crimp fittings. Make sure that the loops are not tangled. It is important that the loop pairs are correctly matched to ensure maximum gripping strength.
Step 3. Tape both crimped fittings to the cable orwaveguide. This will align the loop pairs of the hoisting grip and aid in lacing.
Step 4. Fold the lace in half to form a crease at the center. Starting at the top, pass the lace through the first loop pair so that the crease is between them.
Step 5. Continue lacing so that the seam is straight and the lace is pulled so that the space between both sides of the seam is no greater than the spaces of the mesh next to the loop. Do not skip any loop pairs of the grip when lacing; this will weaken the hoisting grip. The grip can be compressed from bottom to top to simplify lacing.
Step 6. Tightly twist the lacing together several times at the end of the seam. Wrap the lace around the hoisting grip, twist it together, and thread the remainder of lace through the grip . Do not time knots or hitches with the lace because they will not hold.
Step 7. IMPORTANT: First, remove the tape from the top of the hoisting grip. Then, place both hands firmly around the bottom of the gripand slide them upward to the top. This pulling action removes slack throughout the grip. Do this twice. Taping the bottom 3" (76mm) of the grip will help prevent slippage.
Step 8. Attach the hoist line to the grip. Tie the cable or waveguide leader to the hoist line so that the leader does not dangle. Apply tension slowly to the hoist line to allow the hoisting grip to tighten uniformly on the cable or waveguide.
Newsletter
Please enter your email address and subscribe to our news alerts.
Follow us
follow us
Time of issue:2021-04-28 10:55:44


 +8618046224995

 +8618046224995
  +8618046224995